There is a new kid on the block of digital analytics implementations! Adobe has been tirelessly at work developing their libraries, like AppMeasurement for Adobe Analytics or AT.js for Adobe Target, until the challenges in today’s climate of server-side tracking forced them to rethink how data should be collected from web browsers. This was when Adobe invented its new Web SDK to unify all previously used libraries.
With Web SDK, we no longer have multiple libraries to manage but only one compact file. This library will take care of all requests required for analytics and personalization and send them to the Adobe Edge Network, which is Adobe’s approach to server-side tracking. This new technology promises faster load times, less frontend load, and overall easier implementations. I’ve personally written about a Web SDK implementation for Adobe Analytics before and liked it a lot!
As a digital analytics team and a big ambassador of Adobe Analytics and Adobe Target, we wanted to bring this exciting new technology to life on our very own website, the blog you are reading right now. It is based on WordPress, so we hoped things should be easy to integrate. And while we were at it, we could also use this website to experiment with utilizing Adobe Analytics and Adobe Target for recommendations through the Web SDK. What an exciting project!
This series of posts takes you along our journey. In this first post, we will look at how we can integrate Adobe Experience Platform Dynamic Data Collection Tags, by Adobe Launch to WordPress and build a very simple data layer. In the next three posts, we will then figure out how we can integrate Adobe Analytics and Adobe Target to analyze and personalize user experience on this blog. Let’s get started right away!
Implementing Adobe Launch into WordPress
The first part of our project is to lay the foundation of what we want to implement on this blog later on. The most important part of this is the tag management system Adobe Launch, which will handle the metadata from the individual pages on this blog and hand it along to our analytics system Adobe Analytics.
To integrate Adobe Launch onto any page, we have to copy and paste the script from Adobe Launch into the header of the page. The code usually looks similar to this:
<script src="https://assets.adobedtm.com/cg52sdfg3f3fa/28cfgrs4gsve5/launch-6sgfgrg4a983e.min.js"></script>One thing to note here is that we will not use the async deployment option. While it would help to save a few milliseconds on page load, it will potentially hinder us to show personalized content in time without the page flickering for our esteemed readers (more on that in the third post). Now that we know what we need to implement, how do we actually put this code onto our WordPress page?
We experimented with a few approaches for this. WordPress sites use Themes to define the look and feel of a page. A very common approach would be to put the code into the template directly, thereby modifying the code written by the template author. However, this would make it very hard to guarantee that those changes will not be overwritten with a future update of the template, which may become necessary if security vulnerabilities are found. Because we don’t want to change our implementation in the near future, we decided against this approach.
Another approach would be to utilize WordPress plugins like Code Snippets to execute the desired code once WordPress starts assembling the header. We explored this option quite extensively and got some very good results. We still decided against it in favor of some built-in functionality from our WordPress Theme but can recommend the mentioned plugin for anyone who can’t use Theme features.
The Theme we are using, called GeneratePress, is very flexible in defining the exact look of the site. In addition to that, we can also use what the developers call “Elements” to execute custom functionality on predefined points in time, as the mentioned generation of the page header. We are utilizing the wp_head hook for this and executing the snippet shown above. That was simple! To collect all the data we want, let’s next look at how we can put some information into a data layer.
Implementing a Data Layer into WordPress
At DHL, we are following a very classical approach to data layers. Because we are working with a broad community of developers around the globe, we try to make their lives as easy as possible. One way we do that is by not using an Event Driven Data Layer (EDDL) but instead, relying on global Java Script objects and Custom Events. This may not be the most sophisticated way, but it helps us maintain a global standard for our data collection.
From our blog, we would want to collect a set of very simple data points. We are going to start with
- The ID of a page or post
- The type of a page or post
- The title of a page or post
- Attributes of a page, like its categories and tags
While we could collect even more data through the data layer, like the URL of a page, we are going to use Data Elements in Adobe Launch for those easier data points. For a small blog like ours, we are not going to collect data on the page authors for now.
Unfortunately, we had to discover that there are no up-to-date plugins to define a data layer on WordPress that doesn’t come with a tag manager included. We took a look at the Adobe DTM plugin, but it hasn’t been updated for five years and won’t allow us to structure the data layer as we want. In the end, we decided to write the little bit of the required code ourselves.
Now that we are clear on what we want to do, we need to instruct WordPress to expose the information mentioned above in our desired data layer format. To define the desired structure, we use the Elements function from our Theme again to create a simple Java Script object:
<script>
	var dhl_utf_dataLayer = {
		page:{
			id:"",
			title:"",
			type:"",
			attributes:[]
		}
	}
</script>
As you can see, this puts all the meta data we want in the dhl_utf_dataLayer object, specifically in the page section. Thanks to the PHP support of our Theme’s Elements, we can use some built-in WordPress functionality to populate those variables. While WordPress provides a lot of metadata in standardized functions, it is a very tedious process to find out which function to use in which context. Our findings below are the best we could achieve within a reasonable time, so feel free to educate us on which functions would have been better to use.
The ID, title, and type of a given page are quite easy to query. We are using the get_queried_object_id() function to retrieve the object of the current page or post. This function has proven more reliable on pages that just list posts in our Theme. For the title of the WordPress page or post, we can use the wp_title() function. If you take a look at our data layer on this page, you will see that this, for whatever reason, shows some weird characters that we are going to ignore for now and fix later in Launch. Lastly, we use the get_post_type() function to retrieve the type of a page or post. That function works fine on most pages, except for the taxonomy pages, but we couldn’t find a better one. The overall code up to now looks like this:
			id:"<?php echo(get_queried_object_id()) ?>",
			title:"<?php echo(wp_title()); ?>",
			type:"<?php echo(get_post_type()); ?>",
That was the easy part! Now we also want to collect attributes of a given page or post, like its categories or tags. But instead of collecting just the name, we are going to collect it in the required format for Adobe Analytics already, where we want to put it into a namespaced list variable. While we are defining it as an array, the elements need to follow a syntax of “t=<Type of attribute>;n=<Name of attribute>”.
WordPress does not have an easy way to query for both categories and tags at the same time, which is why we need to query for both individually and then combine the returned arrays with the syntax required for Adobe Analytics. In our case, the function for that looks like this, utilizing the get_the_category() and get_the_tags() in individual loops:
			attributes:<?php
				$attributes = array();
				foreach (get_the_category() as $category){
					array_push($attributes,"t=Category;n=".$category->name);
				}
				if(is_array(get_the_tags())){
					foreach (get_the_tags() as $tag){
						array_push($attributes,"t=Tag;n=".$tag->name);
					}
				}
				echo(json_encode($attributes));
			?>
This may look simple at first look but took a ridiculous amount of time to figure out, again because of WordPress’ unclear documentation. If you want to query for the same data on your page, feel free to just use this full code snippet, adapted to your individual needs (you probably want to change the name of the data layer object):
<script>
	var dhl_utf_dataLayer = {
		page:{
			id:"<?php echo(get_queried_object_id()) ?>",
			title:"<?php echo(wp_title()); ?>",
			type:"<?php echo(get_post_type()); ?>",
			attributes:<?php
				$attributes = array();
				foreach (get_the_category() as $category){
					array_push($attributes,"t=Category;n=".$category->name);
				}
				if(is_array(get_the_tags())){
					foreach (get_the_tags() as $tag){
						array_push($attributes,"t=Tag;n=".$tag->name);
					}
				}
				echo(json_encode($attributes));
			?>
		}
	}
</script>
Taking a first look at the actual output, we can see that this code works as expected on a given post:
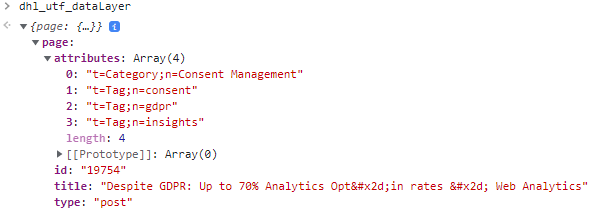
Nice! In the next post, we are going to create the required setup in Adobe Launch to hand those variables along to Adobe Analytics. Stay tuned!

Fromer practice Lead Analytics at DHL with more than a decade of experience in Digital Analytics.
Most know for his analytics blog https://www.fullstackanalyst.io/