This is the fourth and final post of our series on implementing Adobe Analytics and Adobe Target into this WordPress blog through the Adobe Web SDK. In the previous posts, we have utilized Adobe Target to collect data from this page and show recommendations through the Web SDK. In this post, we will take yet another step and personalize the experience for our beautiful readers, most importantly you!
To achieve this, there are again a couple of steps to take:
- Provide an option to let our readers tell us their name
- Pick up the name from the frontend through Adobe Launch and write it into an Adobe Target Profile Parameter
- Show the name in Adobe Target Activities to greet our users
Looks like a good to-do list. Let’s get started right away!
Collect Adobe Target Profile Parameters through Web SDK
Profile Parameters are Adobe Target’s way to collect data about users directly from the frontend. In the previous at.js world, we would attach those to the mbox calls to request content. But before we can do that, we need a way for you, our reader, to actually provide information that we can use.
For the sake of this series, we will use a simple text box and button. We do this through an HTML block within WordPress to host this code:
<input id="user_provided_name" placeholder="Enter your name here!"><br><button id="recommendation_button" onclick="_satellite.track('Personalization Demo', {user_provided_name: document.getElementById('user_provided_name').value});">Submit name</button>This code produces an input field and button like this:
When you click the button, we will trigger a Direct Call Rule for Adobe Launch, handing over the name you provided to the Rule we are using for our personalization. Go ahead! Put your name (or any other text) in there, click the button, and read on to see what it does to this page. Don’t worry, we won’t track your name to Analytics (because what would we do with it anyway?) Pinky promise!
Back in Adobe Launch, we will now trigger a Rule with this Direct Call Identifier. To send the data through Web SDK, we use yet another Send event Action from the Web SDK Extension, as shown here:
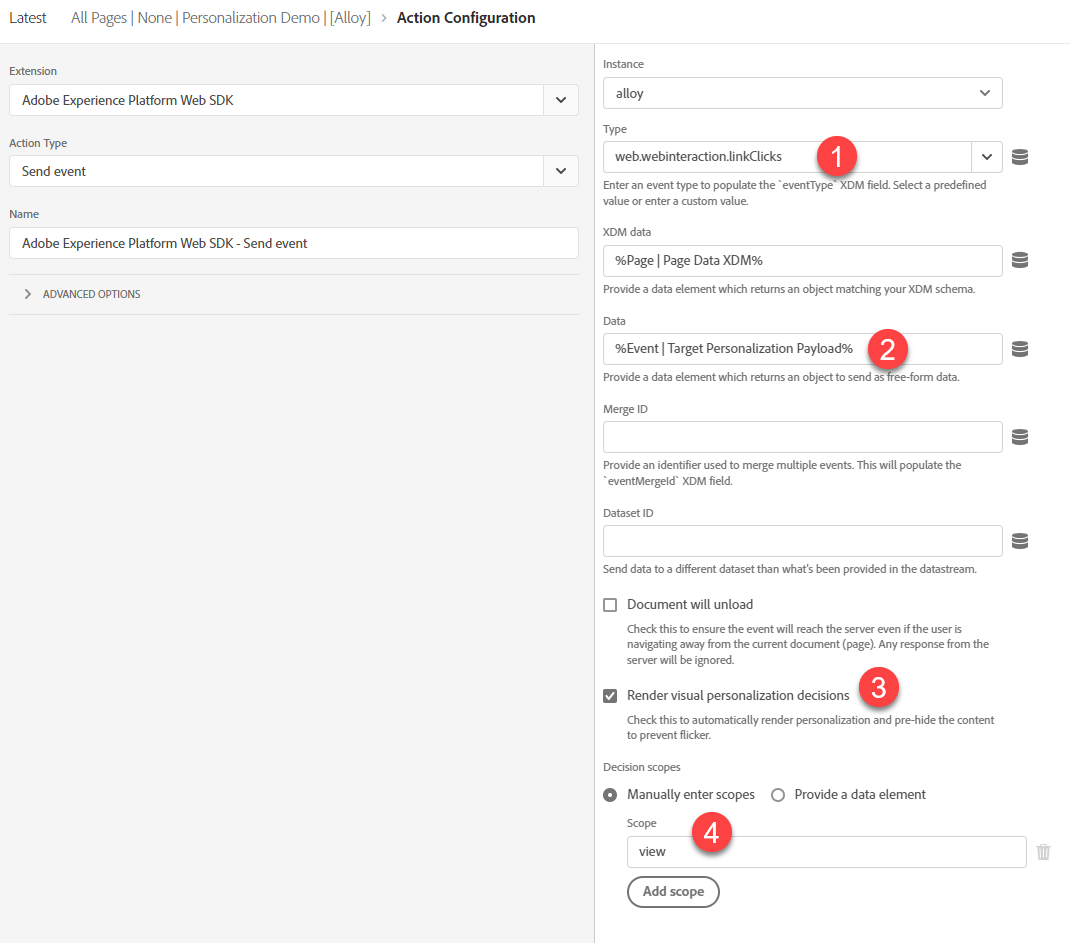
What we changed from the last post is pretty simple. Instead of triggering a Page View for Adobe Analytics, we now use a Link Click instead (1). We are also using a different Target Payload (see below) to pick up the supplied name from you (2). At the time of writing this, there is a bug in Web SDK and AEP that requires us to (3) enable render decisions (even if we don’t want to render anything with this call) and provide a decision scope of “view” (4), otherwise Target won’t pick up the information we supply.
The Data Element we use in step 2 above is again derived from the previous post but has been modified to pick up whatever you put in the text box above:
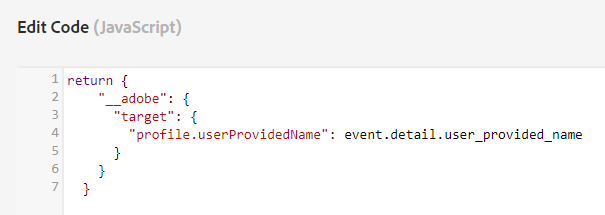
As you can see, the syntax to populate a Profile Parameter for Adobe Target is quite straightforward. We just need to specify it under the __adobe.target data section as “profile.userProvidedName” to, you guessed it, populate the userProvidedName Profile Parameter. Super simple! You can look at what is happening on this page if you want; we have nothing to hide.
Using Adobe Target Profile Parameters for Personalization with Web SDK
Now that we have successfully set the userProvidedName to whatever you put in that text box (if you haven’t done it already, do it now, it’s really fun!) we can access it when we create Activities in Target. First, let’s use it in the Recommendation Activity from the previous post.
If you remember, we have created two designs to show our lovely posts in a 3×1 and 2×2 grid. We can now extend those designs as shown below:
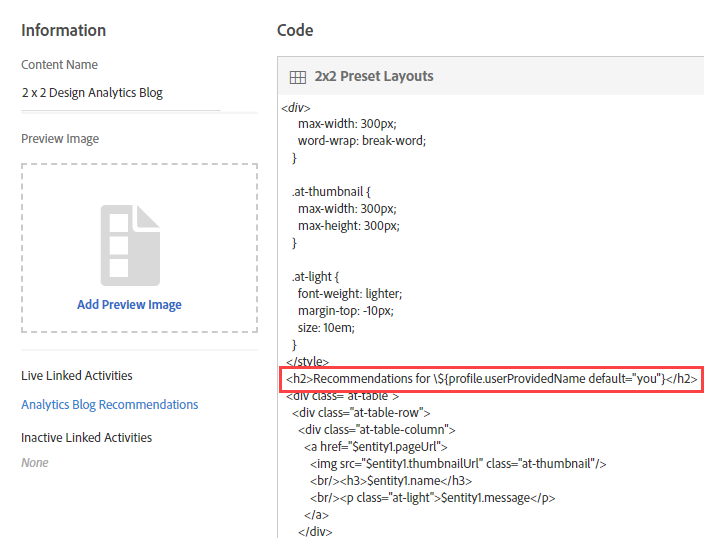
As you can see, we just added the profile parameter to the headline that shows above our recommendations (scroll down on this page to see it in action). The code for this particular headline is:
<h2>Recommendations for \${profile.userProvidedName default="you"}</h2>You can see that the simple \${profile.userProvidedName default=”you”} will pull the name you provided above out of your Adobe Target profile and displays it on the recommendation. Note that the leading slash is required for Recommendation Designs. You can also see that if we don’t have a name from you yet (which, at this point of the post, why wouldn’t you have given to us?), we show a default value of “you”. Neat!
Let’s make this even one step more personal. After all, it should feel cozy and personal on this blog for you! In Adobe Target, we’ve created a nice little Experience Targeting Activity on the homepage for you:
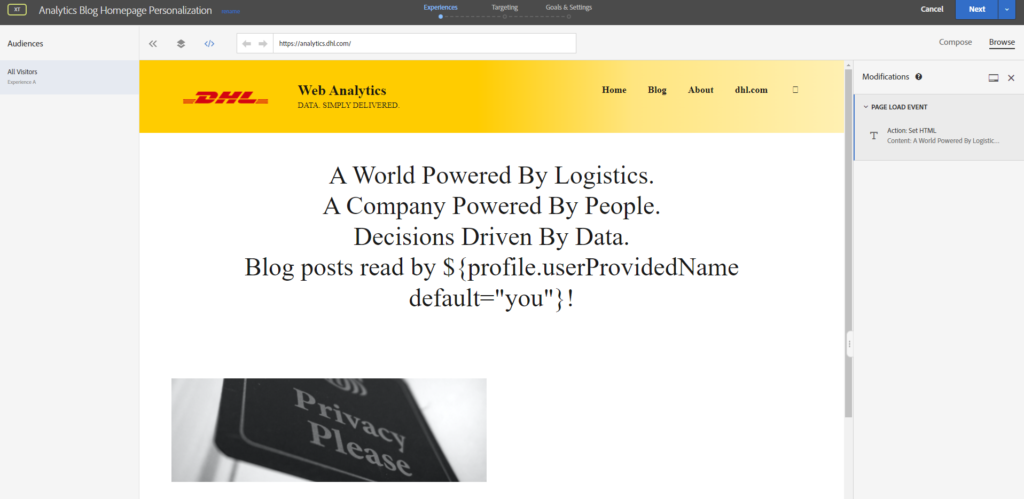
As you can see, we’ve added a new line of text for users who have provided their name to Target. The syntax is slightly different here because we won’t need a leading slash in front of the ${profile.userProvidedName default=”you”} instruction. If you’ve provided your name above, head back to the homepage and take a look for yourself!
To not give this away to everyone directly, we restrict the Audience for this Experience Targeting as shown below:
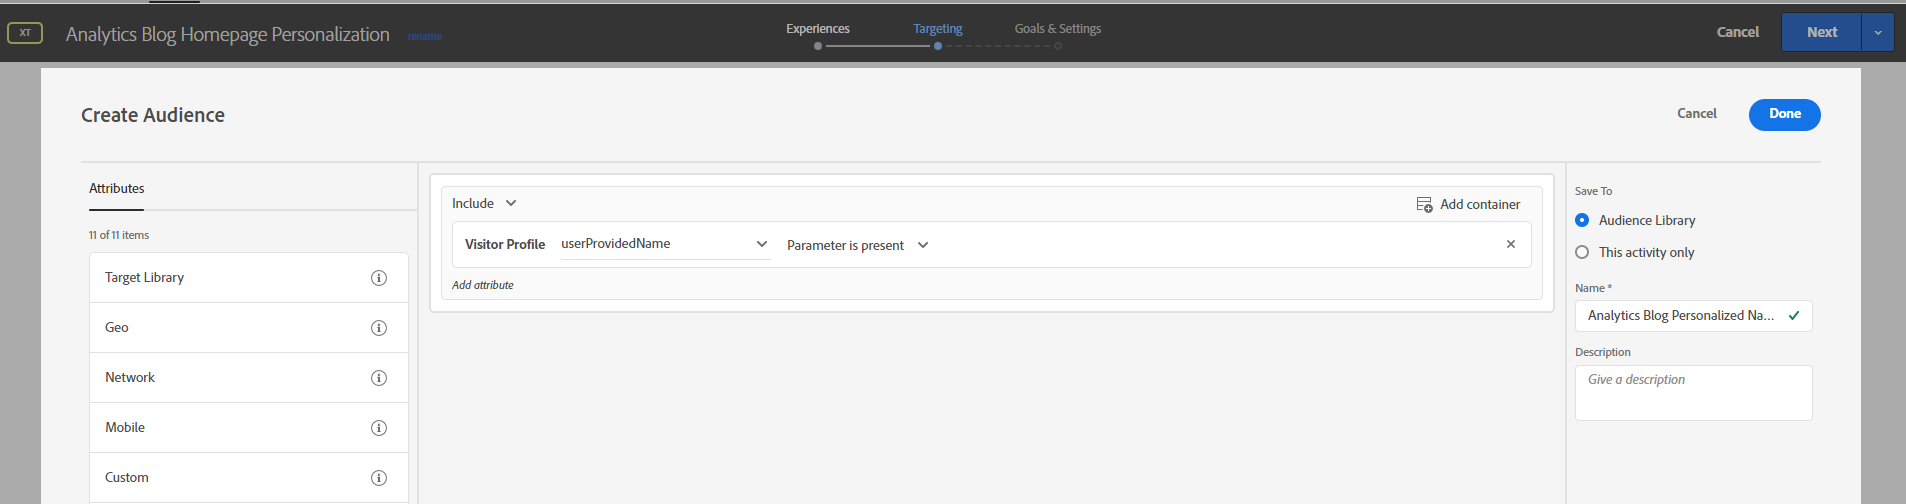
This simple trick will hide the additional line of text for everyone who hasn’t provided their name yet. You can test it for yourself in an incognito window!
Wrap up
We hope this series was as entertaining for you to read as it was for us to create. The setup we have in place now is, given the small size of this blog, quite impressive. Whenever you want to look at Web SDK playing nicely with Analytics and Target, feel free to send people to this series or take a look at our network traffic yourself. See you next time!

Fromer practice Lead Analytics at DHL with more than a decade of experience in Digital Analytics.
Most know for his analytics blog https://www.fullstackanalyst.io/